konfigurasi DNS di server debianmount dvd rom yang berisi master cd debian cd1
apt-cdrom add install bind apt-get install bind9 -y nano /etc/bind/named.conf.local isi sesuai nama domain dan database yg di kehendaki ------------------------------------------------------------------------- // // Do any local configuration here // // Consider adding the 1918 zones here, if they are not used in your // organization //include "/etc/bind/zones.rfc1918"; zone "tkj.com" { type master ; file "/etc/bind/db.tony"; }; zone "100.168.192.in-addr.arpa" { type master ; file "/etc/bind/db.192"; }; -------------------------------------------------------------------------- keluar lalu save masuk ke directory bind dengan peritah cd /etc/bind buat dua buah database baru dengan dengan mengcopy db.local cp db.local db.tony <------ (file ke 1 dengan nama db.tony) cp db local db.192 <------ (file ke 2 dengan nama db.192) edit kedua database baru diatas nano db.tony <------ (mengedit file ke 1) ubah menjadi spt ini ----------------------------------------------------------------------------- ; ; BIND data file for local loopback interface ; $TTL 604800 @ IN SOA ns.tkj.com. root.tkj.com. ( 2 ; Serial 604800 ; Refresh 86400 ; Retry 2419200 ; Expire 604800 ) ; Negative Cache TTL ; @ IN NS ns.tkj.com. @ IN A 192.168.100.1 ns IN A 192.168.100.1 @ IN AAAA ::1 www IN CNAME ns -------------------------------------------------------------------------------------------- keluar + save nano db.192 <------ (mengedit file ke 2) ------------------------------------------------------------------------------------------- ; ; BIND data file for local loopback interface ; $TTL 604800 @ IN SOA tkj.com. root.tkj.com. ( 2 ; Serial 604800 ; Refresh 86400 ; Retry 2419200 ; Expire 604800 ) ; Negative Cache TTL ; @ IN NS ns. @ IN A 192.168.100.1 1 IN PTR ns.tkj.com. 1 IN PTR www.tkj.com. www IN CNAME ns --------------------------------------------------------------------------------- keluar+save lanjutkan dengan perintah ini nano named.conf.options <-------------meng aktifkan forwarder hapus // dan ubah 0.0.0.0 menjadi ip domain baru kita (0.0.0.0 diubah menjadi 192.168.100.1) --------------------------------------------------------------------------------------------------- options { directory "/var/cache/bind"; // If there is a firewall between you and nameservers you want // to talk to, you may need to fix the firewall to allow multiple // ports to talk. See http://www.kb.cert.org/vuls/id/800113 // If your ISP provided one or more IP addresses for stable // nameservers, you probably want to use them as forwarders. // Uncomment the following block, and insert the addresses replacing // the all-0's placeholder. forwarders { 192.168.100.1; }; //======================================================================== // If BIND logs error messages about the root key being expired, // you will need to update your keys. See https://www.isc.org/bind-keys //======================================================================== dnssec-validation auto; auth-nxdomain no; # conform to RFC1035 listen-on-v6 { any; }; }; ----------------------------------------------------------------------------------------------------------------------------- keluar + save pastikan search domain di resolv.conf kita isikan nama domain baru kita nano /etc/resolv.conf ------------------------------------------------------------------------------------------------------------------- search tkj.com nameserver 192.168.100.1 nameserver 8.8.8.8 nameserver 8.8.4.4 ----------------------------------------------------------------------------------------------------------------- keluar+simpan restart dns server /etc/init.d/bind9 restart uji dns kita nslookup tkj.com jika kuncul ----------------------------------------------- server: 192.168.100.1 address: 192.168.100.1#53 name: tkj.com address: 192.168.100.1 ---------------------------------------- maka konfigurasi dns anda berhasil silahkan cek di browser client dengan memanggil address di browser dengan mengetik tkj.com (tidak menggunakan alamat ip lagi) nb. pastikan comp client dns di set dengan primary dns sekundary dns ip 192.168.100.1 8.8.8.8 |
|
|
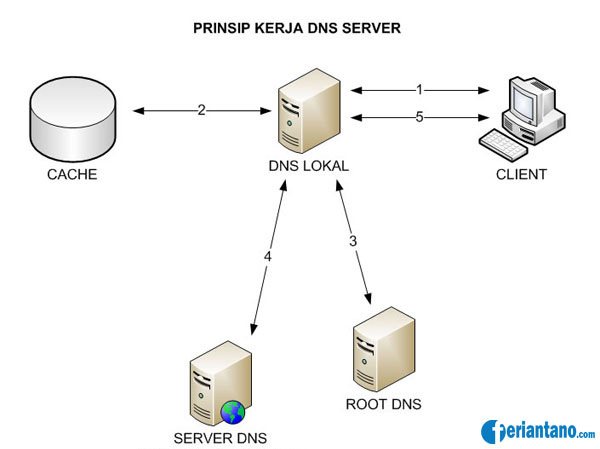
cara kerja dns |